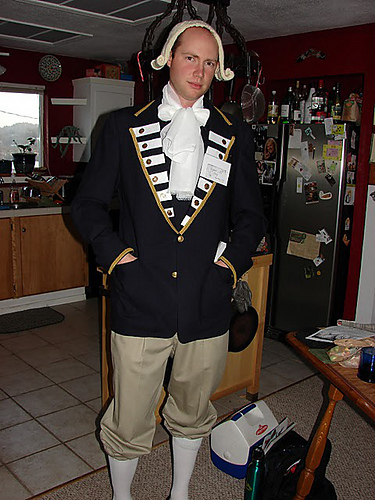
Distinguished Gentleman’s wig
This pattern was created for a Pirate-themed birthday party I had a couple years ago. You can’t be a proper British Naval Captain without a powdered wig! It was inspired by Hallowig, but I had to basically make up my own version, so here it is. If anything is confusing, it might help to glance at that pattern though. This wig is knitted in 3 pieces, the two sides (which will roll up to form the curls) and the ponytail, which are later connected in the round when the bangs are cast on.
This pattern hasn’t been tested or tech edited, and it was written up about 2 years after I knitted it, so if you find problems, please let me know! You may note in the photos that my wig is very short (you can see the natural hairline in the back), I adjusted the pattern to make it longer.
Materials: Size 8 US (5mm) circular needles, plus an extra needle (of any sort) about the same size for BO
Lion Brand Fisherman’s Wool (or any worsted-aran weight, off-white wool), 120 yards.
A bit of ribbon.
Gauge: approximately 19 stitches and 24 rows = 4” You don't need to swatch, but it has to fit your person’s head, so check as you go.
Size- Should stretch to fit an average adult
Sides (make 2)
Cast on 18
Row 1) K1, P1, *knit until last 2 stitches* P1, K1. This purl ditch will keep the sides from rolling too much.
2) P1, K1, *purl until last 2 sts*, K1, P1.
Repeat until piece is 3.75” long from beginning.
Then start increases: K1, P1, Kf&b, *knit until last 3 sts* Kf&b, P1, K1. (20 sts)
Work 3 rows in pattern.
Repeat these 4 rows once more. (22 sts)
Repeat increase row. (24 sts)
Work one row in pattern.
Repeat increase row.(26 sts)
Work one row in pattern. (Finish on the Wrong side.)
Cut yarn; put the sides on stitch holders or spare yarn. (Piece should be about 5”)
Back:
Cast on 6 sts.
1) K1, p1, K2, p1, K1
2) P1, K1, P2, K1, P1
3) K1, P1, K2 tog, P1, K1 (5 sts)
4) P1, K1, P1, K1, P1
5) K1, P1, K1, P1, K1
6) repeat row 4
7) repeat row 5
8) repeat row 4
9) Start increases: K1, P1, Kf&b, *K until last 3 sts* Kf&b, P1, K1
Work 3 rows in pattern (knit the knits, purl the purls)
Repeat these 4 rows 6 more times. 19 sts. Ponytail should be about 5.5” long. Cut yarn

Connect the sides and back:
Knit across one side (continuing the one purl stitch just inside each edge), then Kf&B across all ponytail stitches, Knit across second side. 90 sts.
Knit back-and-forth in pattern (all stockinette except the 4 edge stitches) for 3 more inches. Sides should measure about 8” total. End on a wrong side.
Crown:
Knit around the side, back, side, Cast on 15 stitches for bangs and join in the round. P1 (edge stitches of next round), place marker for new beginning of row. 105 sts.
Continue in pattern, including the established ribs at the beginning and end of rows. Continue this K1 P1 pattern through the newly cast-on bang stitches. (Row should K 88, *P1, K1* to end of row, ending with a purl. There should be 17 total ribbed stitches, including the already established edge “ditches”).
Repeat for 2 more rows.
Then knit all stitches except the 2 purl “ditch” rows at the edge of the 2 sides, outlining the bangs. Knit until 1” from ribbing.
Set up for decreases:
*Knit 21 sts, place decrease marker* repeat until bang stitches.
Decrease:
*Knit to 1st marker, slip marker, k1, ssk, K to 3 sts before next marker 2, k2tog, k1, slip marker. * Repeat for other 2 markers. Work the bang stitches as established (knitting all but the 2 purl edges).
Work the decreases every round until 6 sts remain between markers (15 decrease rows). AT THE SAME TIME, Every other row, decrease the bangs as follows: P1, K1, SSK, Knit until last 3 sts, K2tog, P1.
The bangs should measure 3” and be almost all decreased at this point.
Remove st markers, put the first half (between center front and center back)on one side of the circular needle, and second half on the other side of the needle.
Flip inside out, and do a 3-needle BO.
Finishing: Weave in all ends. Turn right-side out. Roll up the bottom 3-4” of the sides and tack down to form the curls. They should be located just at the bottom of your ears. Feel free to make a couple extra 4" squares if you want more curls, just roll up & tack on! Tie a ribbon around the narrow part of the pony tail. If you want to be really fancy you can make a tassel and sew it on the end of the ponytail. The wig may need to be felted slightly to fit, but that will make it more realistically wiggy!
Wear to all important Royal events, or to capture scurvy sea dogs.
Note- if you want it to be more of a novelty hat and less of a costume wig, knit your favorite ear-flap hat pattern as the crown, placing the wig curls and ponytail at the proper spots (either sewn in or knitted on).