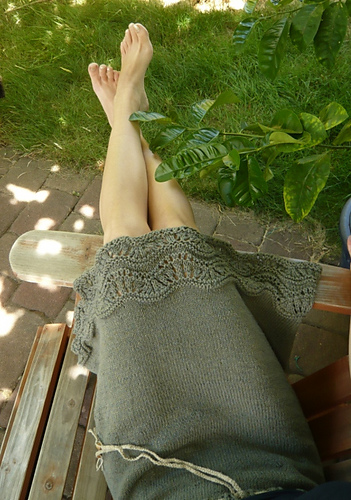
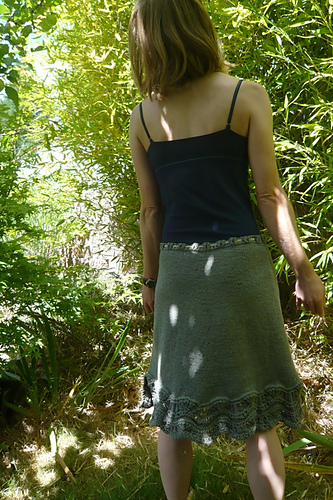
I decided to knit a summery skirt in a olive green hemp/cotton, and the wavy hem made me think of summer in the ocean! Here are my notes if you wish to knit one too.

The yarn I used is not commercially available, it is a hemp & cotton blend from Yarnia. It was about 850 yards of DK weight to light worsted, however, so it should be easy enough to replace with another cotton/ hemp/ linen yarn. Elsebeth Lavold Hempathy would probably be a great fit.
My gauge before washing the swatch was 23 sts /32 rows in 4", and after washing it shrunk slightly, to 23.5 sts/ 35 rows. Washing the swatch is not something I normally do, but it's vital with this type of yarn, as it changes quite a bit with machine washing.
I measured my favorite a-line summer skirt to get the measurements, and then cast on extra for a loose waist, knowing I wanted to do a drawstring.
Use your gauge and your measurements to figure out what to cast on for your own waistline (it sits at the low hip). Make sure it is an even number. Place a marker, and join in the round.
For my own skirt I CO 170 on size US 4 needles (3.5mm), giving a 28" waist (which turned out to be much looser than necessary, but it works)
Knit 2 rows of K1, P1 rib.
Knit one row of K1, * YO, K 2 together* The eyelets should be in the purl rows, with the K2togs continuing the ribs.
Do 2 more rows K1, P1 rib.
Switch to size 5 US (3.75 mm) needles.
Because my row gauge gave me 8.75 rows per vertical inch, I did increases on every 9th row, giving a nice, flowing skirt. To do this, on the first row after the ribbing, I placed markers at 85 stitches (halfway) and 127 sts (center back). Be sure the extra pair of "booty" increases are on the back of your skirt!
Knit 4 rows stockinette stitch, and then do your first increase: *Knit to 1 st before marker, make one, knit 1, slip marker, knit 1, make one.* Repeat that at each of the 3 markers.
Doing these 6 increases every 9th row meant I increased an inch in circumference for every inch longer the skirt grew.
Continue knitting in stockinette stitch, doing increases every inch, until skirt reaches 17”, or 4" less than you want your total length. Remove increase markers.
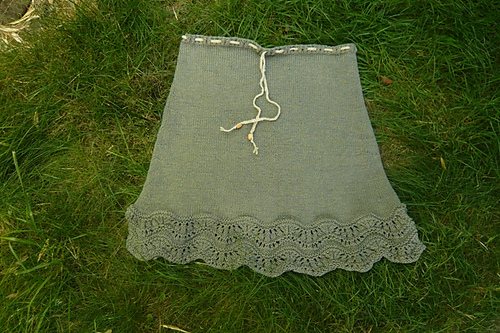
Now it is time to start the lace hem, which takes some number wrangling, as it is an 18 stitch pattern, so you want each half to be divisible by 18, give or take a few.
My last regular increase (at 16”) got me to 244 stitches, so I put a marker at 122, and knit one more row, increasing 4 on each half. Remember, you have some wiggle room with border stitches, if you have to increase a million to get it to a repeat of 18.
Switch to US size 9 (5.5 mm) needles and split for the hem by working on one half at a time. (for me, 128 sts, including the 2 edge stitches).
On the first row of the pattern, I increased 1 stitch at each end to form a single-stitch garter border, which is knit EVERY row, regardless of the pattern row. I found it very helpful to place stitch markers every 18 stitches, to delineate my pattern repeats.
Do 1 repeat of chart 1, one of chart 2, an additional repeat of chart 1, and then knit chart 2 through row 4. Bind off loosely purl-wise (on the right side).
Weave in ends, and chose a cute ribbon or string for your drawstring. I macrame-knotted hemp twine for mine, like a really long necklace.
Here are the charts, both of which are 18 stitch patterns, repeated across the skirt. Remember your garter border stitches on either end!
Chart 1
1.) [k]18
2.) [k]18
3.) [k]18
4.) [k2tog]3x, yo, k, yo, k, yo, k2, yo, k, yo, k, yo, [k2tog]3x
5.) [p]18
6.) [k2tog]2x, yo, k2, yo, k2, yo, k2, yo, k2, yo, k2, yo, [k2tog]2x
7.) [p]20
8.) k2tog, [k]16, k2tog
Chart 2
1.) [k]18
2.) [k2tog]3x, yo, k, yo, k, yo, k2, yo, k, yo, k, yo, [k2tog]3x
3.) [k]18
4.) [k]18
5.) [p]18
6.) [k]18
Do you have a pdf file of this pattern?
ReplyDeleteI would also like to know if you have a pdf of this pattern. It's a beautiful shirt!
ReplyDeleteHi,
ReplyDeleteThe yarn I have shows increases quite a bit so I am going to put them at the sides. If I do that I need to make an adjustment from 3 sts every 9 rows. If I increase 2 sts every 6 rows will that work out to what you did. I think I did the math ok but I often mess up with knitting some how.